 Pin it
 My neighbor showed up at my door with a box of these little black pots overflowing with gold, and I was instantly enchanted. She'd made them for St. Patrick's Day, and watching my kids dig into the cake while laughing at the whimsical design made me realize this wasn't just dessert—it was theater on a stick. I asked for the recipe that same afternoon, and now they're my go-to when I want something that feels both celebratory and surprisingly doable.
Last March, I brought a batch to my book club thinking they'd be a nice touch, and one friend literally gasped when she saw them. She spent the whole evening telling people about the little pots of gold, and someone even asked if I did this professionally. That moment taught me how much joy comes from putting just a little extra thought into presentation, especially with something as simple as cake pops.
Ingredients
- 1 box (400 g) chocolate cake mix: This is the foundation, and using quality mix makes a real difference in how moist and flavorful the final pop tastes.
- Eggs, oil, and water as required by package: Follow your mix's instructions exactly—these proportions are what give you that perfect crumb structure.
- 120 g (½ cup) chocolate frosting: The glue that holds everything together; homemade is lovely, but store-bought saves time and works beautifully here.
- 400 g (14 oz) black candy melts: These create that pot-shaped coating and are forgiving to work with since they melt smoothly and set quickly.
- 48 g (2 oz) gold sprinkles or edible gold pearls: This is where the magic happens—choose pearls if you want that luxe look or sprinkles for a more playful vibe.
- 24 lollipop sticks: The backbone of your pops; I've learned to invest in thicker sticks so they don't snap during dipping.
- 50 g (1.75 oz) white candy melts (optional, for accents): Use these if you want to pipe a delicate rim around each pot—it adds sophistication without much effort.
- Green fondant or sprinkles for shamrocks: A optional detail that takes them from cute to completely festive if you're feeling ambitious.
Tired of Takeout? 🥡
Get 10 meals you can make faster than delivery arrives. Seriously.
One email. No spam. Unsubscribe anytime.
Instructions
- Bake and cool your cake:
- Preheat your oven and follow the box instructions carefully, then let that cake cool completely on a wire rack—this step matters because warm cake won't crumble the way you need it to. I learned this the hard way by trying to rush it once.
- Turn cake into crumbs:
- Break the cooled cake into a large bowl and crumble it with your hands until it looks like coarse breadcrumbs. Don't overthink this—a few chunks are fine and actually give better texture.
- Make the mixture:
- Add your chocolate frosting and mix with a spatula or your hands until it forms a dough-like consistency that holds together when squeezed. It should feel like modeling clay.
- Shape your pots:
- Scoop the mixture into balls about 1.5 inches across, then gently flatten the tops to create a pot shape rather than a perfect sphere. This detail really sells the effect.
- Chill the balls:
- Place them on a parchment-lined tray and refrigerate for 30 minutes—this prevents them from falling apart when you dip them later. Set a timer so you don't forget.
- Prepare your coating:
- Melt your black candy melts in a microwave-safe bowl in 30-second intervals, stirring between each one until smooth. Don't rush this or the melts will seize up.
- Stick your pops:
- Dip the tip of each lollipop stick into the melted candy, then insert it halfway into each cake ball. This creates a bond so the stick stays put.
- Set the sticks:
- Chill for 10 minutes so the sticks are firmly anchored before you dip the whole pop. This prevents last-minute disasters.
- Dip fully:
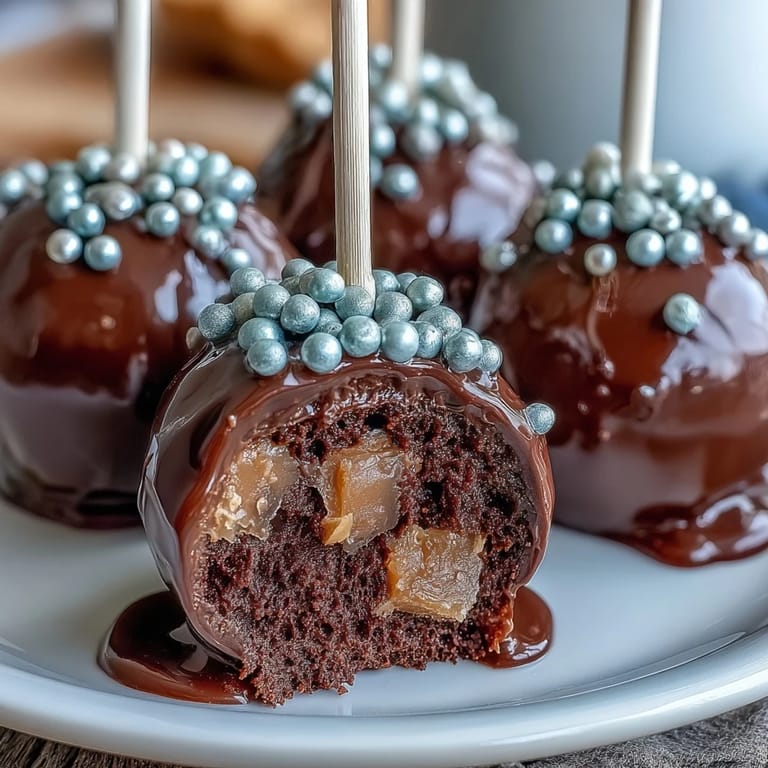
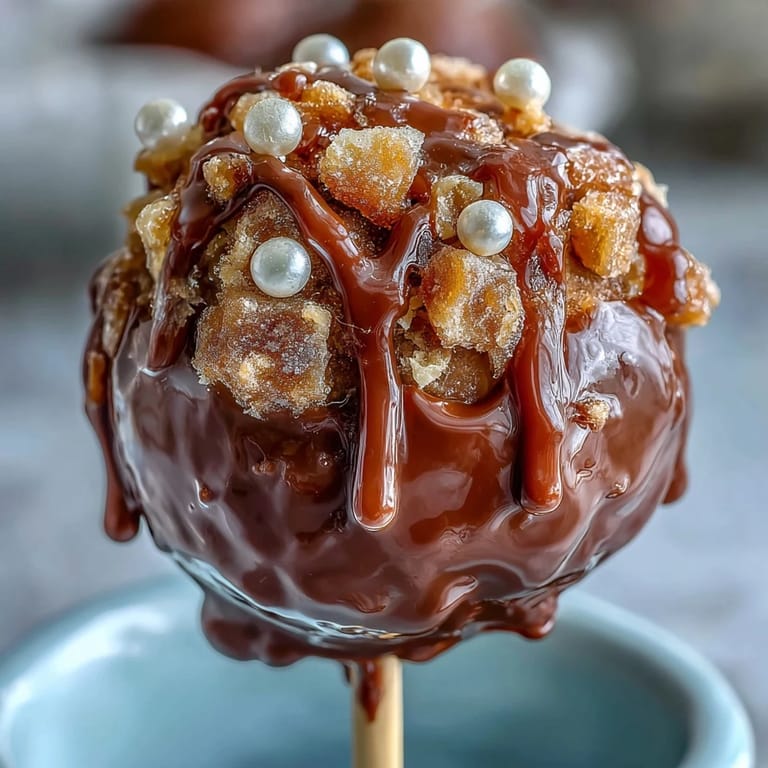
- Dip each cake pop into the black melts, letting the excess drip off, then stand them upright in a styrofoam block or cake pop stand. Work quickly so the coating doesn't get too thick.
- Add the gold:
- Before the black coating sets, sprinkle your gold immediately on top—this is the moment when it will stick best. The sparkle is what makes these truly shine.
- Optional rim details:
- If using white melts, pipe a delicate circle around the top edge of each pot for a sophisticated touch. A small squeeze bottle works better than a piping bag here.
- Shamrock accents:
- Add green fondant or sprinkles if you're in the mood—these are purely for fun and can be skipped without losing the magic.
- Final set:
- Let everything cure completely at room temperature before packing or serving, usually about an hour total.
 Pin it
 There's something about watching someone bite into one of these and see their eyes light up at the combination of flavors and that little surprise of edible gold. That's when I realized these aren't just cake pops—they're tiny celebrations you can hold in your hand.
Timing and Planning Ahead
These can be made in stages, which is honestly why they fit into my life so well. I'll bake the cake the night before, mix and chill the balls another day, and save the dipping and decorating for when I actually have a moment to focus on making them look pretty. Breaking it into chunks makes it feel less overwhelming and gives you room to breathe between steps.
Storage and Keeping Them Fresh
These last surprisingly well in an airtight container at room temperature for up to three days, which means you can make them ahead for a party without worrying they'll get stale. I keep mine in a decorative box wrapped in parchment so they look gift-ready, and honestly, they're just as lovely on day two as they are on day one.
Customizing Your Pots of Gold
Once you understand the basic technique, there's so much room to play. I've made versions with different sprinkle colors, added semisweet chocolate chips for extra richness, and even tried swapping the chocolate frosting for salted caramel on a whim. The beauty of this recipe is that it's flexible enough to match whatever mood or flavor combination you're craving.
- Try adding a teaspoon of vanilla extract to your frosting mixture for subtle extra depth without changing the character of the pop.
- Use a toothpick dipped in melted white candy to write tiny shamrocks or initials on each pot for a personalized touch.
- Store any extra black and white candy melts in an airtight container and reuse them for the next batch—nothing gets wasted.
 Pin it
 Making these reminds me why I love cooking for people in the first place: it's the little moments of magic, the chance to create something that brings happiness. These pots of gold do exactly that.
Common Questions
- → What type of cake mix works best for these cake pops?
A chocolate cake mix provides a rich, moist base that complements the black candy coating well.
- → How do I ensure the cake balls hold their shape during decorating?
Refrigerate the formed cake balls for at least 30 minutes before dipping to firm them up and prevent crumbling.
- → Can I substitute the black candy melts with another coating?
Yes, white candy melts or colored coatings can be used, but black candy melts provide the classic pot appearance.
- → How should I store the finished cake pops?
Keep them in an airtight container at room temperature for up to three days to maintain freshness and texture.
- → Are there options for gluten-free variations?
Use a gluten-free cake mix and ensure all decorations and coatings are gluten-free-certified to adapt this treat accordingly.
- → What decorating tips enhance the pot effect?
Flattening the top slightly and piping a rim with additional candy melts helps mimic the pot shape, while gold sprinkles simulate coins.